1. In what ways does your media product use, develop or challenge forms and conventions?
Plan:

2. How does your media product represent particular social groups?

3. What kind of media institution might distribute your media product and why?
Due to this, I think our film would probably be more likely to be distributed by industries such as the BFI, ‘Warp films’ and ‘Handmade films’. This is because, whilst our genre (action) isn’t traditionally adopted by such companies; our use of different, interesting editing techniques; a variety of camera shots and angles, and the presence of anti-heroes, makes our film less conventional and less likely to be distributed by larger companies.
4. Who would be the audience for your media product?


5. How did you attract/address your audience?


Desolate Drone
Dripping Tap
Generic Movie Title
Industrial Vent
Mechanolith (Soundtrack)
Nothing Left To Say (Cover)
Prelude and Action (Soundtrack)
6.What have you learnt about technologies from the process of constructing this product? + Editing
Plan:

Over the duration of the coursework for media, myself and the people in my group have progressively developed new skills and techniques regarding the use of technologies in our work. Throughout the coursework we heavily relied on computers and other forms of technology as a means of transferring data (such as video clips from memory cards) but also for editing tasks. When reflecting back on my preliminary task at the very beginning of the year, I can clearly see our progression in our final outcome. Initially, we had no real knowledge of editing, having only a basic understanding of how to use a camera and tripod. In our preliminary we were incapable of addressing technical issues and clearly did not plan our film beforehand. For example, we had not charged the batteries on the camera and did not know how to use the Tripod correctly which resulted in unsteady shots and a less professional video. From thence onward we have learnt new skills regarding how to use a camera to its full extent, allowing for greater quality footage but also by adjusting thing like exposure and shutter speed to create different effects.
Editing:
I think one of the main benefits to help catalyse our understanding of technology in our work was perhaps by creating several smaller short (2 minute) films. This allowed us to observe what would make a film successful and meant that we could analyse what went wrong. Our teachers set us deadlines for these short films and allowed us different amounts of time to give some diversity in our work and prepare us for working to deadlines later on. One of our fist short films was the recreation of the 2 minute opening of the film "Submarine" by Richard Ayoade. None of use in our group had watched the filmed before seeing the opening which meant we had no idea of what the film was about nor what techniques were used to film it. We were simply set the task of mirroring the opening scene by any means possible, replicating shots and lighting but also dialogue. This really challenged our skills when working with technology. I was working in a smaller group for this particular film which meant we couldn't rely on others knowledge of the camera or ideas to produce a higher quality outcome. Alternatively, I used sites such as "youtube" to help guide my work and learn more about how the camera worked and what techniques were suitable for the shots found within the opening. At this point our knowledge was still fairly basic and we couldn't completely mirror the film to the same level of quality. However, it was the editing side of this task that I really enjoyed. I realised that I could really manipulate the film despite its filming quality, somewhat upgrading its cinematography. At first I started with basic effects such as adjusting brightness, contrast, and applying various filters such as auto correct and stabiliser. Throughout editing I was assisted by peers on particular areas I struggled with and learnt how to scale the image correctly to the full resolution of the screen and how to export correctly. I also had some level of idea on how to construct titles and the ident at the very beginning ( I used a youtube tutorial for this) to help enhance the quality.
After this task we were set the "1 hour filming task" where we had to produce, film and edit an idea, having just an hour to complete the task. Before this we were separated into groups amongst the class which meant we could work with people we wouldn't normally work with. Some members of the team were to think of the concept for an idea, another set of people were to film it, and I was left to edit it. In this task I had no idea of the concept or the level of filming, meaning I had to use my initiative and understanding of technology to create a successful film. I also had a time limit of just 30 minutes to add different effects and audio. This was the ultimate test as to how I could rely on technology to produce a form of media but it also gave insight as to what the industry is actually like from Producing stage, Camera work and editing.
In my final opening sequence I have developed my editing skills significantly from the very beginning of my filming experience from the preliminary task and other filming studies throughout the coursework. In the film, I used additional software, besides premiere pro, to extend my editing capability. For example, I used both Photoshop and After effects to create the ident at the beginning of the clip but also for other effects. By using mostly adobe products throughout the work I could easily carry my skills across due to similar key commands and panels. By combining these different software packages (they worked coherently together by using adobe creative cloud) I could craft a much higher quality product than if I were to use just one form of software.
Throughout the editing stage I also relied on audio in areas of music and dialogue within the clip. From the initial films I used basic technologies such as mobile phone and camcorder sound recorders for audio playback in my films. However, the level of quality from these devices were fairly sub-standard and the sound appeared rather amateur. When analysing 2 minute openings in research throughout the coursework I realised that many relied heavily on the audio to assist the footage and create a more dramatic effect. This is something I feel I have achieved in my final product, using audio in the background but also with the footage which is something I avoided in earlier films due to lack of experience. In our final clip I used audio mics and professional recording studios to deliver higher grade sound which I think makes it a little more believable. By using studios and computer software I could remove any background sound and increase the clarity and volume of the audio in the clip. We also used small mics for our characters to record into whilst filming which meant we could deliver raw sound in greater detail than sound recorded on a phone. We used both diagetic sound (door slams, dialogue and footsteps) but also non diagetic sound (music). Without technology we wouldn't have been able to include these sounds as well as merging sound together for a more intense and believable end product.
To conclude I think that we have significantly developed our skills regarding technology which has been used effectively for our final outcome. All skills I have learnt from completing earlier filming tasks have meant I have had first hand experience of what makes a successful film product which can only be helped by the use of modern technologies. Without the aid of professional filming equipment such as the DSLR camera, Audio mic, tripod, rigs, and computer software our final product wouldn't have been as successful.
7.
Link to our Preliminary film: https://drive.google.com/file/d/0B6MOJQ2P-4koWWJ3OVRoTTJ5eHM/view
1.Final cut of your opening 2 minutes. In sequence, with titles.
2. Looking back at your preliminary task, what do you think you have learnt in the progression from it to your main product.
When reflecting back at my preliminary task I am aware of how I have clearly developed and progressed as a media student, really building skills on filming technique, editing task, evaluations but also media as a whole. Initially, I had a very basic understanding of the film industry, only really watching films without much thought as to how they were made. I think this is somewhat evident in my preliminary task as I had hardly any knowledge of things like the mise en scene, dialogue and sound which resulted in a poor quality product. I can recall having to hand hold the camera instead of using the tripod so the camera aligning wasn't very accurate but also having issues with sound. We filmed it all in scene which gave it very little diversity compared to my final cut which I think is a mark of my improvement.
However, currently I feel I am a much more independent and creative person, having progressed my knowledge through the blog which gave me the opportunity to explore all areas of the media industry,. By Simultaneously doing the coursework I could go back and correct mistakes and ultimately learn new techniques which I wouldn't have been capable of doing without this knowledge. Furthermore , a vast majority of my work was assisted by the use of technology which helped rectify a range of issues through filming. Even when doing my preliminary the use of Adobe premiere pro resulted in a far more professional outcome. The program (even without much knowledge of adobe programs) allowed me to adjust a variety of things such as the exposure, contrast levels, and vibrancy. Although, one of its most beneficial features was the "stabiliser" tool which could smoothen out any shaky clips. However, in my final clip I experimented with far more complex and challenging editing tasks, using a range of software to compile the clip. For example, by using after effects (which worked efficiently with Premiere pro) I could create the opening ident which I wasnt able to do in any other program. I also used time lapsing, and "ghosting" in third party applications that I could then import directly into the main body of film. I also realised (from the very beginning) that the editing side of media wouldn't necessarily resolve issues made during filming; it would assist it a little. As a result I knew that for our final film we needed to capture everything to the last detail, even if it required us to film a particular shot multiple times. For example I used the blurring on one of the final shots to focus the audiences attention to the two characters, making them centre of attention. I think this worked really well and was something I wouldn't have thought about when doing my preliminary film.
Here is an example of just one of the many effects I used whilst editing our film:

A similar effect found within the tv program "Sherlock" I was interested in the crime/detective genre of this program, incorporating the security camera views gave a different perspective to the scene whilst simultaneously adding a sense of realism which therefore makes it more believable.

Additionally, I have learnt many new skills regarding filming too. By using a DSLR camera (as opposed to the hand held camera we used for our preliminary) I could experiment with many more effects, filming in a high quality (1080p) which gave the final outcome a much more sharper image and therefore a much higher degree of professionalism. In our final clip we used wide range of camera angles, such as the very long shot, long shot, medium close up, extreme close up, pan shot, and over the shoulder shot. All these effects gave the product much more interest instead of just using entirely just one or two types of shots. I also explored other effects whilst using the DSLR camera, including focal ranges and background blurring.
Ultimately, I feel that I have become a much more able student, being able to resolve issues without the need of others knowledge and but also being able to challenge the conventions of a typical film opening sequence in a new way - something I feel I have achieved in my FINAL CUT.
Plan:

2. How does your media product represent particular social groups?

3. What kind of media institution might distribute your media product and why?
The kind of media institute that might distribute our media product would depend on how we were to continue our film. If we continued with the objective of creating a film that would earn a large profit, it would be distributed by very different companies than if we were to continue with the aim of making our film as artistic and well filmed as possible.For instance, 'Disney Pixar', 'DreamWorks' and 'Marvels' tend to produce films that would sell to a large target audience, have well-known actors in their cast and invest in advertising. They also produce merchandise that extends the interest in the film and allows them to make more money and improves their casting opportunities merchandise (as actors often get a cut of the profit made from them). Due to this, they would probably want a film with clear heroes and villains or two distinct sides for the audience to choose from. They would also be looking for a plot that is relatively simple so it would be easy for younger ages to follow.
On the other hand, companies such as 'Warp films', 'Handmade films' and the BFI usually produce more artistic, original films. An example of a common type of film that is predominantly produced by these companies is cult films. Cult films are usually more transgressive; they don’t comply with the basic poles of good and bad. They tend to go against conventions and characters within them have more of a rebellious attitude or consider themselves outcasts.Due to this, I think our film would probably be more likely to be distributed by industries such as the BFI, ‘Warp films’ and ‘Handmade films’. This is because, whilst our genre (action) isn’t traditionally adopted by such companies; our use of different, interesting editing techniques; a variety of camera shots and angles, and the presence of anti-heroes, makes our film less conventional and less likely to be distributed by larger companies.
4. Who would be the audience for your media product?


5. How did you attract/address your audience?


Desolate Drone
Dripping Tap
Generic Movie Title
Industrial Vent
Mechanolith (Soundtrack)
Nothing Left To Say (Cover)
Prelude and Action (Soundtrack)
6.What have you learnt about technologies from the process of constructing this product? + Editing
Plan:
Over the duration of the coursework for media, myself and the people in my group have progressively developed new skills and techniques regarding the use of technologies in our work. Throughout the coursework we heavily relied on computers and other forms of technology as a means of transferring data (such as video clips from memory cards) but also for editing tasks. When reflecting back on my preliminary task at the very beginning of the year, I can clearly see our progression in our final outcome. Initially, we had no real knowledge of editing, having only a basic understanding of how to use a camera and tripod. In our preliminary we were incapable of addressing technical issues and clearly did not plan our film beforehand. For example, we had not charged the batteries on the camera and did not know how to use the Tripod correctly which resulted in unsteady shots and a less professional video. From thence onward we have learnt new skills regarding how to use a camera to its full extent, allowing for greater quality footage but also by adjusting thing like exposure and shutter speed to create different effects.
Editing:
I think one of the main benefits to help catalyse our understanding of technology in our work was perhaps by creating several smaller short (2 minute) films. This allowed us to observe what would make a film successful and meant that we could analyse what went wrong. Our teachers set us deadlines for these short films and allowed us different amounts of time to give some diversity in our work and prepare us for working to deadlines later on. One of our fist short films was the recreation of the 2 minute opening of the film "Submarine" by Richard Ayoade. None of use in our group had watched the filmed before seeing the opening which meant we had no idea of what the film was about nor what techniques were used to film it. We were simply set the task of mirroring the opening scene by any means possible, replicating shots and lighting but also dialogue. This really challenged our skills when working with technology. I was working in a smaller group for this particular film which meant we couldn't rely on others knowledge of the camera or ideas to produce a higher quality outcome. Alternatively, I used sites such as "youtube" to help guide my work and learn more about how the camera worked and what techniques were suitable for the shots found within the opening. At this point our knowledge was still fairly basic and we couldn't completely mirror the film to the same level of quality. However, it was the editing side of this task that I really enjoyed. I realised that I could really manipulate the film despite its filming quality, somewhat upgrading its cinematography. At first I started with basic effects such as adjusting brightness, contrast, and applying various filters such as auto correct and stabiliser. Throughout editing I was assisted by peers on particular areas I struggled with and learnt how to scale the image correctly to the full resolution of the screen and how to export correctly. I also had some level of idea on how to construct titles and the ident at the very beginning ( I used a youtube tutorial for this) to help enhance the quality.
After this task we were set the "1 hour filming task" where we had to produce, film and edit an idea, having just an hour to complete the task. Before this we were separated into groups amongst the class which meant we could work with people we wouldn't normally work with. Some members of the team were to think of the concept for an idea, another set of people were to film it, and I was left to edit it. In this task I had no idea of the concept or the level of filming, meaning I had to use my initiative and understanding of technology to create a successful film. I also had a time limit of just 30 minutes to add different effects and audio. This was the ultimate test as to how I could rely on technology to produce a form of media but it also gave insight as to what the industry is actually like from Producing stage, Camera work and editing.
In my final opening sequence I have developed my editing skills significantly from the very beginning of my filming experience from the preliminary task and other filming studies throughout the coursework. In the film, I used additional software, besides premiere pro, to extend my editing capability. For example, I used both Photoshop and After effects to create the ident at the beginning of the clip but also for other effects. By using mostly adobe products throughout the work I could easily carry my skills across due to similar key commands and panels. By combining these different software packages (they worked coherently together by using adobe creative cloud) I could craft a much higher quality product than if I were to use just one form of software.
Throughout the editing stage I also relied on audio in areas of music and dialogue within the clip. From the initial films I used basic technologies such as mobile phone and camcorder sound recorders for audio playback in my films. However, the level of quality from these devices were fairly sub-standard and the sound appeared rather amateur. When analysing 2 minute openings in research throughout the coursework I realised that many relied heavily on the audio to assist the footage and create a more dramatic effect. This is something I feel I have achieved in my final product, using audio in the background but also with the footage which is something I avoided in earlier films due to lack of experience. In our final clip I used audio mics and professional recording studios to deliver higher grade sound which I think makes it a little more believable. By using studios and computer software I could remove any background sound and increase the clarity and volume of the audio in the clip. We also used small mics for our characters to record into whilst filming which meant we could deliver raw sound in greater detail than sound recorded on a phone. We used both diagetic sound (door slams, dialogue and footsteps) but also non diagetic sound (music). Without technology we wouldn't have been able to include these sounds as well as merging sound together for a more intense and believable end product.
To conclude I think that we have significantly developed our skills regarding technology which has been used effectively for our final outcome. All skills I have learnt from completing earlier filming tasks have meant I have had first hand experience of what makes a successful film product which can only be helped by the use of modern technologies. Without the aid of professional filming equipment such as the DSLR camera, Audio mic, tripod, rigs, and computer software our final product wouldn't have been as successful.
7.
Link to our Preliminary film: https://drive.google.com/file/d/0B6MOJQ2P-4koWWJ3OVRoTTJ5eHM/view
1.Final cut of your opening 2 minutes. In sequence, with titles.
2. Looking back at your preliminary task, what do you think you have learnt in the progression from it to your main product.
When reflecting back at my preliminary task I am aware of how I have clearly developed and progressed as a media student, really building skills on filming technique, editing task, evaluations but also media as a whole. Initially, I had a very basic understanding of the film industry, only really watching films without much thought as to how they were made. I think this is somewhat evident in my preliminary task as I had hardly any knowledge of things like the mise en scene, dialogue and sound which resulted in a poor quality product. I can recall having to hand hold the camera instead of using the tripod so the camera aligning wasn't very accurate but also having issues with sound. We filmed it all in scene which gave it very little diversity compared to my final cut which I think is a mark of my improvement.
However, currently I feel I am a much more independent and creative person, having progressed my knowledge through the blog which gave me the opportunity to explore all areas of the media industry,. By Simultaneously doing the coursework I could go back and correct mistakes and ultimately learn new techniques which I wouldn't have been capable of doing without this knowledge. Furthermore , a vast majority of my work was assisted by the use of technology which helped rectify a range of issues through filming. Even when doing my preliminary the use of Adobe premiere pro resulted in a far more professional outcome. The program (even without much knowledge of adobe programs) allowed me to adjust a variety of things such as the exposure, contrast levels, and vibrancy. Although, one of its most beneficial features was the "stabiliser" tool which could smoothen out any shaky clips. However, in my final clip I experimented with far more complex and challenging editing tasks, using a range of software to compile the clip. For example, by using after effects (which worked efficiently with Premiere pro) I could create the opening ident which I wasnt able to do in any other program. I also used time lapsing, and "ghosting" in third party applications that I could then import directly into the main body of film. I also realised (from the very beginning) that the editing side of media wouldn't necessarily resolve issues made during filming; it would assist it a little. As a result I knew that for our final film we needed to capture everything to the last detail, even if it required us to film a particular shot multiple times. For example I used the blurring on one of the final shots to focus the audiences attention to the two characters, making them centre of attention. I think this worked really well and was something I wouldn't have thought about when doing my preliminary film.
Here is an example of just one of the many effects I used whilst editing our film:

A similar effect found within the tv program "Sherlock" I was interested in the crime/detective genre of this program, incorporating the security camera views gave a different perspective to the scene whilst simultaneously adding a sense of realism which therefore makes it more believable.

Additionally, I have learnt many new skills regarding filming too. By using a DSLR camera (as opposed to the hand held camera we used for our preliminary) I could experiment with many more effects, filming in a high quality (1080p) which gave the final outcome a much more sharper image and therefore a much higher degree of professionalism. In our final clip we used wide range of camera angles, such as the very long shot, long shot, medium close up, extreme close up, pan shot, and over the shoulder shot. All these effects gave the product much more interest instead of just using entirely just one or two types of shots. I also explored other effects whilst using the DSLR camera, including focal ranges and background blurring.
Ultimately, I feel that I have become a much more able student, being able to resolve issues without the need of others knowledge and but also being able to challenge the conventions of a typical film opening sequence in a new way - something I feel I have achieved in my FINAL CUT.
Link to our Preliminary film: https://drive.google.com/file/d/0B6MOJQ2P-4koWWJ3OVRoTTJ5eHM/view
In our first lesson of as media studies we were asked to create a preliminary task. This involved filming someone walking through a door and engage in a conversation with someone else and then leave. We were told to include filming techniques: match on action, the 180 degree rule, and shot/reverse shot.
Filming Shots:
- Match on action-This is an editing technique in which a shot is filmed from one perspective and then cuts to another view of that same action.
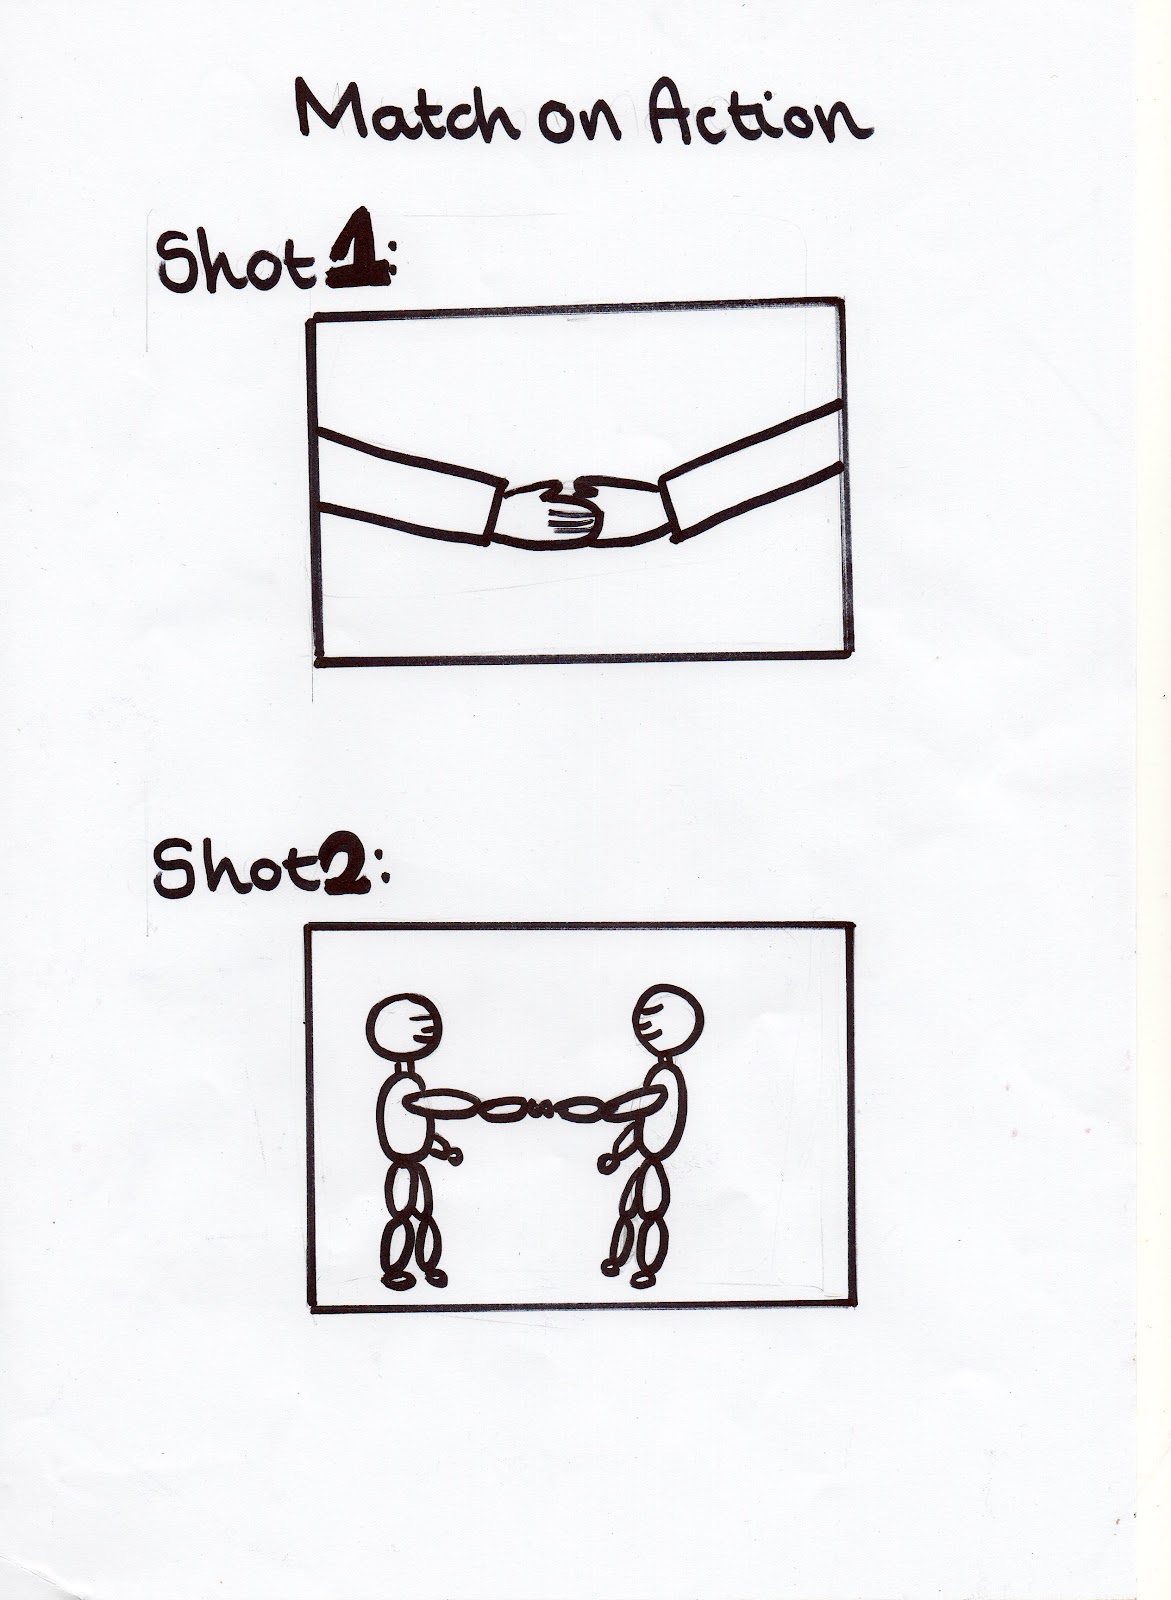
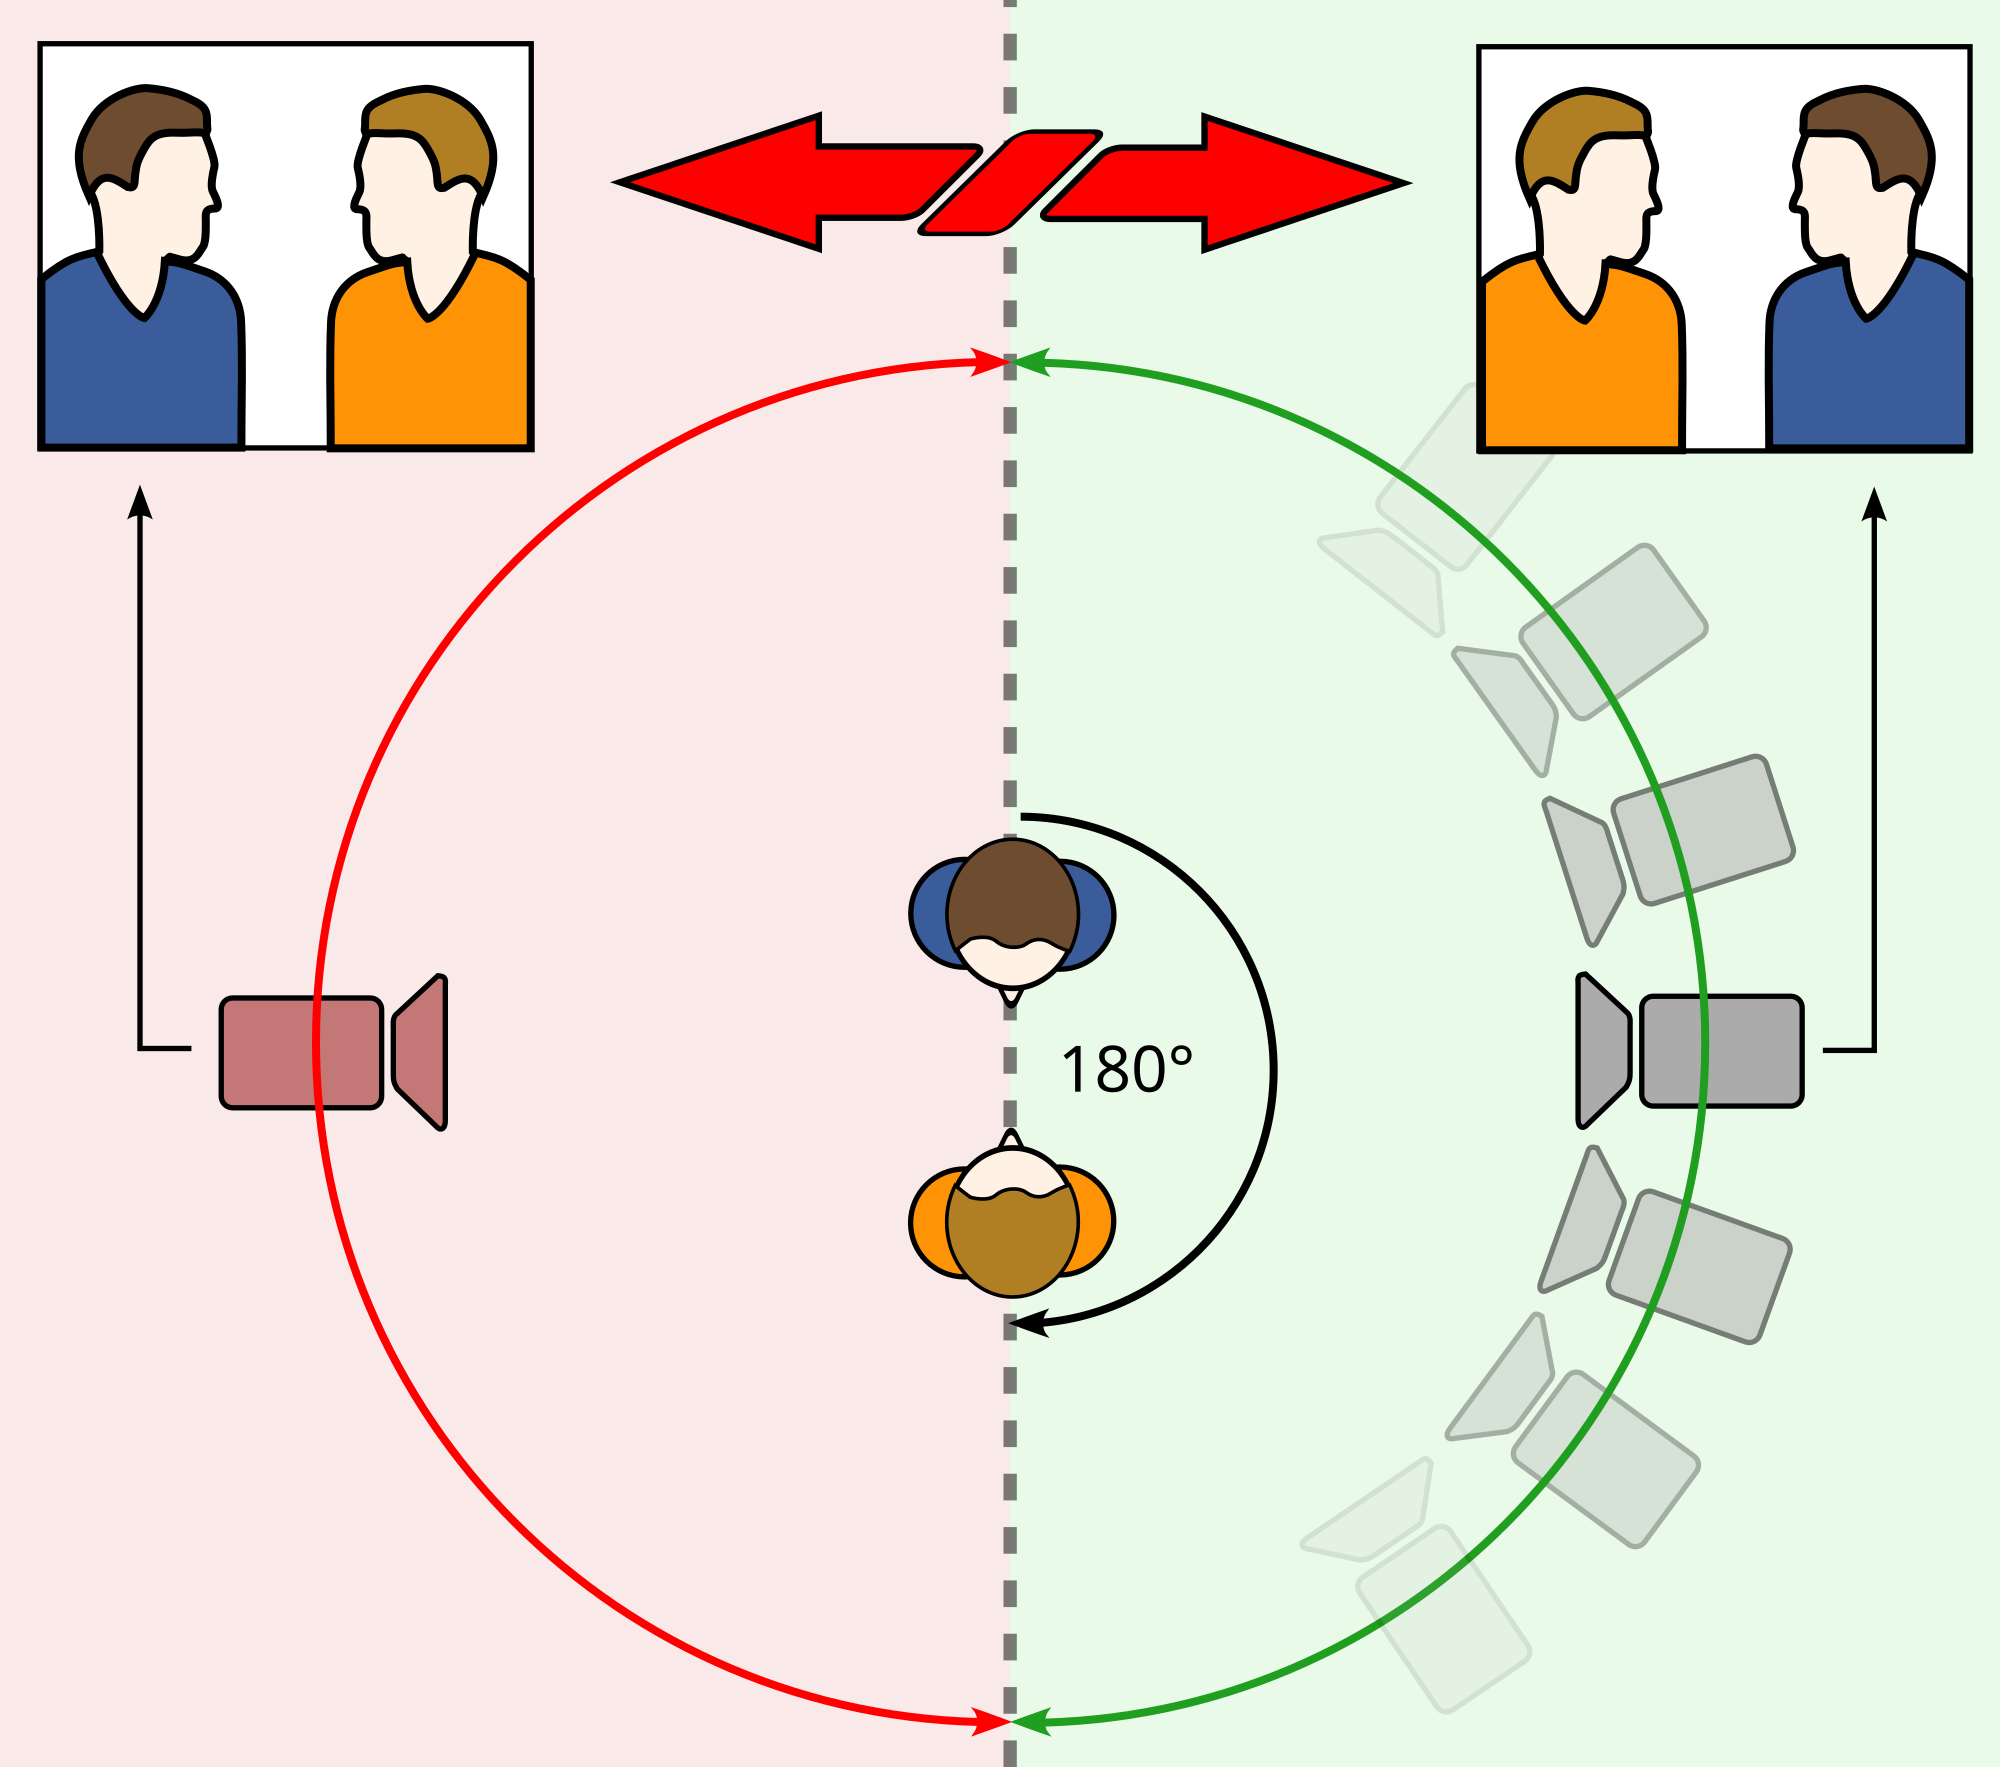
- 180 Degree Rule- This a guideline where the on screen spacial relationship between characters or objects within a scene.
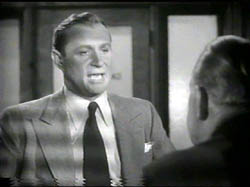
- Reverse Shot-When someone is filmed from behind looking at another person (usually within conversation) and then the other person is filmed looking back at the original character.
Evaluation:
As a group of five we discussed our idea rather quickly, suggesting that the plot should be kept simple and include only two characters. Our video is around 30 seconds long again making the video all the more curious and enigmatic. We used a tripod to keep the camera steady whilst filming; this really helped us get a steady shot. The tripod equipment was also very light meaning we could carry it easily from one place to another and really focus on the filming side of the task. It also meant we didn't have to hand hold the camera which made the filming element considerably easier and more professional. After filming, we had a lesson to edit the footage using Adobe Premiere Pro. This software allowed us to import and edit our clips. Initially, we started doing basic things like adjusting frames and making sure it was in order. However, as we started to understand the program we could develop our skills and focus on effects like "exposure" and "glow" or lighting that I think gives the footage a more professional outlook. The lighting effect in particular really helped us change the overall mood of the scene as to begin with it was quite bright and warm looking but by changing a few visual elements we could gradually manipulate the light intensity/exposure, contrast, blurr, and other effects to make it look slightly more cold/dull looking which suited the sort of style we were after. However, as this was our very first film-making experience that clip could be improved through numerous ways. For example, the camera angles often appear of balance and the subject matter not in the centre. Also, some scenes like the filming of the door, last for too long which prevents the storyline to continue as smoothly as they could as opposed to a shorter and more dramatic clip. One reason behind this was mainly lack of experience with equipment like the tripod but also because our hand held camera had no charge, meaning we had to hold the cable in to a socket whilst filming which was a compromise to the positioning of the camera itself.
Ultimately though, I feel the Preliminary task was successful as it meets the required specification (this being to film a character opening a door and exchanging dialogue with another character) and things like the lighting were in fact of a good quality to make the scene a little more believable. Alternatively, next time I compose my own filming sequence I will ensure that things like the camera battery are charged and things like the subject were in the centre of the frame, also taking into consideration the background noise which is particularly noticeable outside-perhaps investing in a boom pole or non-diagetic commentary in a music studio?
This is our rough cut for our opening sequence:
By completing a rough cut of our final opening sequence we were able to identify any areas in the film that didn't work as well. The film does not include all of the audio or music we intend to use and is by no means finished as both the audio and footage do not correspond and some scenes have since been altered. However my initial reaction was the 'dripping tap" sound effect that I don't think works at all with the footage we filmed. The concept of this in our planning stage seemed like a good idea but in practise, clearly does not work. Other audio failures involved the lack of diagetic sound from the footsteps of our characters walking past the camera and the door slamming. There is also a lack of dialogue sound when characters are speaking. This is something I will have to focus on in the editing, meaning I will have to re-import the video with the attached audio file and "unclip" them using premiere pro's panel. I will also need to adjust the lighting under the "effects" preset to enhance the colour correction and brightness of the image. I also realised how some of the footage was a little shaky such as the skylight scene which will be easily corrected using the "stabiliser" tool. This feature detects anomalies of areas of fractal noise or unsteadiness and removes/adjust's it accordingly. I wanted to leave this effect until I export it as it takes considerable time and takes more memory on the school computers.
Ultimately, I feel I have made good progress with the footage so far and am keen to develop it. By creating a rough cut I was able to witness areas that could be improved upon from the perspective of the audience. I will now upload this to youtube to exhibit the footage and receive feedback regarding how I could improve it.
Audience Feedback:
When showing the clip to class mates and family at home I learnt some ideas from other people, addressing issues or areas they liked most that I wouldn't necessarily think of myself:
classmate - " I think the opening sequence so far is really successful. I really enjoyed the visual effects made using after effects and premiere pro like the security camera scene. It really makes the narrative of the story more believable, leaving me more inclined to carry on watching. Although, I would say that you could experiment with the audio fade tool in premier pro. You could also use the volume adjustment panel in "effect controls" to time record the volume of the audio in particular clips like where Charlie holds the phone to his ear"
Classmate - " The idents at the very beginning are really professional, I like the animation and the audio works well. I really the range of shots, you have covered almost every camera angle which gives your opening sequence better diversity which actually makes it more believable, for me. However, I would say the dripping tap audio doesn't quite work with the footage and is a little too distracting from the atmosphere you have created with the camera work. I would stick with darker, more slow music that could be played quietly in the background. You could also use two audio files together, merging sounds to create a more abstract, intense soundtrack."

Through my feedback I have taken some more ideas to consideration. I really like the idea of fading in and out the audio which would work really well for particular scenes. I will also experiment with the "audio gain" tool which allows me to time a volume preset which would work well for the scene where Charlie holds the phone to his ear, temporarily dismissing the soundtrack for the viewer to hear what he says before fading back to the main audio.
Saturday 16th January 2016 ( 9:30-11) - Filming taking place at Wymondham High School basement. Including all characters: Meghan, Charlie, and Tom.
Review of day;
What worked well:
I think the entire day of filming was successful. We stared at around 9:30, meaning we could promptly begin work. Before filming we reacted what we wanted our actors to do, suggesting their positioning in the room and their interaction with one another.
What didnt work as well:
Whilst filming we had to retake a few shots due to props being in the wrong position and thing like our camera bags getting in the way. We also has to refilm shots where we were talking over the footage or the shot was particularly unsteady.
Anything that might/ does need to be re-filmed?
No, we won't need to film any more. Before filming I made it clear that we should over film, filming each scene at least three times so the editing would be much easier, thus avoiding the need to ref-film.
Did everything run smoothly?
We made good progress throughout the day, having no big issues with the camera or things such as the mise-en scene.
Any changes you are making?
We decided to add an additional shot of Meghan slamming the door to complete darkness after both the detective and the interrogator are seen entering the secondary room. We thought of a last-minute idea where we would film the skylight from below, having a set of us walk over the top to give the impression there was no escape from the room - emphasises the idea of seclusion and vulnerability.
Did you use your storyboards to good effect?
By printing out a copy of my storyboard, we could all understand the sequence of events chronologically. This helped us know which scenes to film next and how the scene would play out.
Sunday 17th January 2016 (8:00-3) - Filming taking place in Norwich city centre, The Mall.
What worked well:
The day was a complete success for filming. Despite the cold weather, the levels of light, amount of people, and locations were ideal for filming purposes. Initially, we wanted to film the areas that would get most busiest later on in the day at the beginning of the filming as to avoid this issue had we filmed it later on. We then worked our way inside, filming the insides of the mall while it wasn't very crowded.
What didnt work as well:
The only location that was the hardest to film was the underpass shot. It was this area that was relatively busy, meaning we had to retake footage if people were acting unordinary in front the camera.
Anything that might/ does need to be re-filmed?
By filming additional footage we won't need to re-film any footage as I have a large selection of clips to work from when I edit the clips. I may also use parts of one clip with another for a better outcome.
Any changes you are making?
We decided to cut down some of the shots to ensure that we made two-minutes. With the amount of footage we could have had a much longer opening sequence but because of the limit we had to rethink some shots. For example, we were going to include an extreme long shot before the slow motion scene to establish where the characters were but decided to just film one long shot in place to meet the required time limit.
Did you use your storyboards to good effect?
Similarly, we used the same storyboards to help decide, chronologically the order of events. However, as I have explained we did not completely abide by the filming times of this due to the amount of people in the city.
Below are some photographs I took whilst filming our opening sequence. We actually used these photographs to aid our filming technique and visualise how the scene would be filmed. These photographs also allowed us to observe a snapshot of how the scene would look like, immediately giving us the opportunity to decipher what would work or not. By breaking each shot down we could create a chronological order of events which really helped on the filming day. However, we did find that we had to film particular scenes at different parts of the day depending on light exposure and the amount of people in the city.

One of the first scenes is of the basement where a single pan shot moves from left to right. This is one of the longest scenes in the clip as to "establish" the scene and allow the audience to engage with what is happening and what might happen next. When editing, I used various presets found within premiere pro to adjust things such as the lighting and the level of exposure. I also made every basement scene black and white to elaborate upon the rather dark, harrowing atmosphere. This effect was also used to signify (later on in the flashbacks) that this scene happened at a previous date to the main action. These different effects really enhance the image quality and allow for a greater shot as opposed to raw footage.

This is the scene that Charlie (interrogator) walks into the next room followed my Meghan. This was a particularly hard shot to film due to the level of light which also reduced the camera video quality. However, we realised that by shining a light behind both characters we could create a silhouette that i think looks rather intimidating and certainly more dramatic.

This is the first chase scene where we see both Charlie and Tom run down an alley. The camera pans to the left (mirroring the first shot to show this is a new scene) with tracking on their movement. This film took several attempts due to the shakiness of the camera and people getting in the way of shot.

This is around the mid-point of the film where both Tom and Charlie are seen running out of the mall and down the steps. We needed to film relatively close but still using a long shot to fit the whole scene in. At this point we wanted Charlie to almost catch Tom, using slow motion in premiere pro simultaneously with the music to create a tense scene to separate the action.

For this shot we used the light to our advantage as it looked good against both the trees and characters as they ran. For this shot, Tom runs past camera and Charlie stops. A close up shot shows Charlie pull up his phone. At this point the music will briefly pause or seem quieter before easing tempo and volume when charlie exits off screen.

This is one of the final shots for our opening shot. Here we used the mid-close up shot to reveal the rather uncomfortable, intimidating scene where Charlie confronts Tom in the underpass. We decided to use this shot instead of angles such as the long shot or medium long shot. This being because we thought that the close up shot would mark the end of the journey, an end to the opening and leave our audience wanting more. By changing the cameras depth of field we could experiment with different focal values which allowed us to get the blurred background and the sharper focus of Charlie and Tom. This really gives the viewer a focus and draws them in as opposed to a shot all in focus.
Additional Images (behind the scenes)


